

You should set up a directory (used for both input and output files) just for a single proposal. Since RPS2 generates a large number of intermediate files, the amount of room you will need in this directory will depend on the size of your proposal. Only very large proposals require more that one megabyte for these intermediate files.
Start RPS2 by typing the following at the Unix prompt:
For example, if RPS2 was installed in directory /user/local/bin/rps2, type:
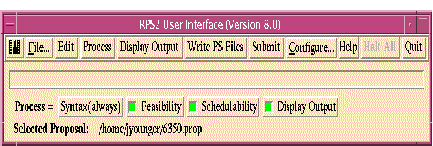
At first you will see the servers start (described in Configuring the Servers and Bringing Them Up and Down); then a small graphical window, shown above, will appear on your screen. This window has buttons along the top row that invoke the tools and options for RPS2. Place the mouse pointer on top of a button to see a short explanation of its function.
The " Configure " button on the UI allows you to change the default configurations of RPS2. Clicking on this button brings up a menu of options (described in the following subsections), and when you change the configuration of an option, it goes into effect immediately. When you " Quit " RPS2, these defaults are saved in your home directory to a file named .rps2-init . The next time you bring up RPS2 these options will still be in effect. Many of the options have to do with the subsystem servers. If you need to know more about the client/server nature of RPS2, see How RPS2 Works
If you cannot run some (or all) of the servers on your own computer and servers exist on a computer which is more convenient to you than the one at STScI, a preference for this computer can be specified using the " Configure Routing " option from the " Configure " menu. Click on the word " Machine ," type in the Internet Protocol (IP) address or IP name (e.g., 130.167.107.14 or anarky.stsci.edu) of the computer desired, and click on " Apply ."
When RPS2 comes up, it will by default attempt to start all the servers in your installed configuration. If they are already up from a previous session, RPS2 will detect this and will not attempt to start new ones. This behavior can be changed using the " Configure Servers " option from the " Configure " menu. The four servers of RPS2 are listed, and each one can be configured not to start when RPS2 is started. You can also stop and restart the servers in real time from this menu. This can be useful if you want to experiment with which servers you want to run locally and which you want to run at STScI through the Internet. (Note that it takes approximately 5 minutes for the operating system to clear the server connection. So if you bring the servers down and try to bring them back up immediately, they will not come up because they already appear to be running.)
When you first bring up RPS2 and click the " Edit " button, you are asked to select a default editor (a text editor or PED). You can change the default editor later by selecting the " Configure Editor " option from the " Configure " menu.
In order to set the default font size for reports created by the Description Generator, select the " Configure Description_Generato r " option from the " Configure " menu. Next to the word " zoom " enter an integer between 0 and 2 (0 for 10 point, 1 for 14 point - the default, and 2 for 18 point). After you have entered 0, 1, or 2, click on " Apply ."
By default RPS2 will only process only the visits in a proposal that have changed since the last time it was processed. Additionally RPS2 will only run the subsystems that have not been run yet on a version of the proposal. (So if you run syntax checking and then decide to finish processing, the syntax checking step will not run the second time.) There are no known problems with these time saving features, but as a safety measure, there is a way to turn this off. Select the " Configure Processing " option from the " Configure " menu and click on " Entire Proposal . " Then click on " Apply " to commit the change.
General Observers (GOs) should start with the template supplied by their Program Coordinator. This template has most of the text sections already filled in from your Phase I proposal; the rest of it contains a single visit and single exposure skeleton with all the keywords and special requirements already provided.
The appropriate Instrument Handbooks provide guidelines for instrument use, and the Phase II Proposal Instructions (Version 8.0G) provides the proper syntax to write a proposal. Before writing the entire proposal, you may wish to try out a small subset of the proposal (i.e., one visit with a few exposures) to become accustomed to proposal writing and see how RPS2 works.
Please contact your PC with any questions about writing your proposal.
Once a draft of the proposal has been written, RPS2 can be used to check for syntax problems, evaluate potential implementation problems, and determine if and where it can be scheduled.
If you haven't already done so, choose the " Select Existing File " option from the " File... " button at the top of the window and then use the resulting dialog box to select your proposal from your proposal directory.
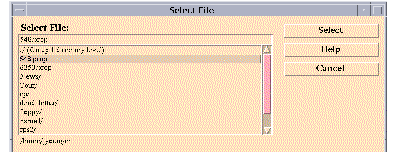
Choose your .prop file and then click on " Select ."
Then click on " Process " on the User Interface (UI). In a few seconds, a progress meter will appear, appended to the bottom of the existing UI.
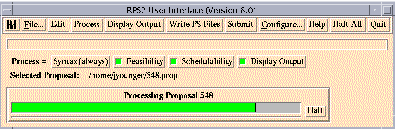
A proposal with one target and one visit will generally take about 10 minutes to process fully the first time. If you find RPS2 runs too slowly, see sections Using Only Some of the Subsystems during Processingand Making RPS2 Run Faster for some tips on getting it to run faster.
When you bring up RPS2 for the first time, all three subsystems will be selected (the button in front of them will be green ). Click on the green button to turn off the selection of a subsystem.
Processing a proposal will put many small files in your working directory. In general, you should not delete these files as they store intermediate results and the final output. Many of the files are recalculated each time you process, but if you need to view the current output again later, you can do so without reprocessing the proposal. Note that there is a target file created by the Schedulability subsystem which is created on the first run and reused in subsequent runs (the file is simply updated as you change targets in the proposal). If you delete all the files, or move the proposal to a new directory, that target file will need to be recreated, which takes time.
When processing is complete, a new screen will automatically appear called "RPS2 Description Generator", which is a separate interface used to display the processing results (see Reviewing the RPS2 output). This interface also has options displayed at the top, allowing you to select a particular report or change a display format. A short explanation of an option will appear just below the top row if the cursor is placed over its button.
Note that the main progress meter on the RPS2 User Interface remains at the step "Creating Visit Analysis Reports" until you use the Description Generator. Once you click on something in the display, the progress meter will say "Activating Description Generator Buttons."
The option to have the Description Generator come up automatically after processing can be turned off by clicking off the red button next to the words " Display Output " on the main RPS2 panel.
If you need to process many proposals in batch, this can be done using the command line version of RPS2 (How to Run the Command Line Version of RPS2) and a shell script. Contact your PC if you need help. Here is an example shell script:
Some proposals will be so large that they will take a long time to process through all the subsystems. If a proposal has started processing and you wish to stop it (e.g., you forgot to change something), click on " Halt " (next to the progress meter). This aborts all subsequent processing on that proposal. If you are processing and/or displaying multiple proposals and would like to stop everything, use the " Halt All " button at the top of the User Interface. If the progress meter fails to go away completely after performing these steps, there probably has been a communications error. Quit RPS2 and start over again.
The information generated during RPS2 processing is summarized in two types of graphical reports: the Proposal Summary Report and the Visit Analysis Report. These are created automatically after processing (the default) or by clicking on " Display Output " at the top of the window.
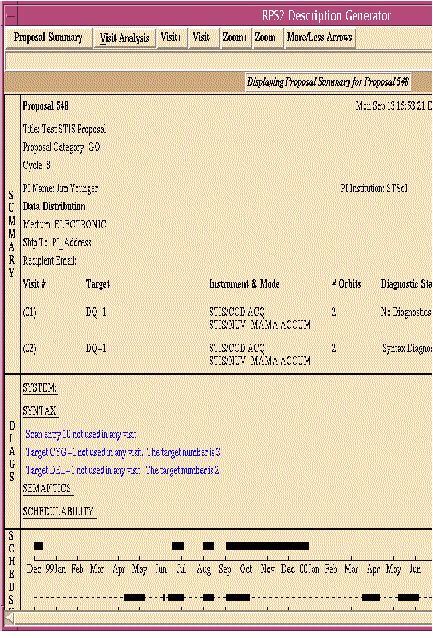
Select this report by clicking on " Proposal Summary " at the top of the Description Generator window. It consists of the following sections (picture on Proposal Summary Report):
Select a report for a particular visit by clicking on " Visit Analysis " at the top of the window, and then select the visit of interest in the pull-down menu. (Alternatively, you can use the " Visit+ " and " Visit- " buttons to select visits in numerical order.)
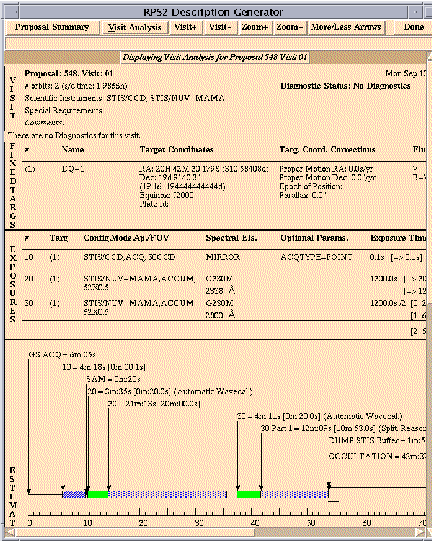
Each Visit Analysis Report is divided up into the following sections:
This section lists the number of orbits used, science instruments, visit-level special requirements, visit-level comments, and if there are any diagnostics.
This section summarizes all outstanding error, warning, or informational messages in the visit. They are broken down into System, Syntax, Feasibility, and Schedulability. These messages are generally short; longer, more detailed explanations are available by clicking on the message of interest. A small window will appear on the screen with both the short and long explanations. Click on " Dismiss " at the bottom of the small window when you are finished reading the message.
Since the output from Feasibility and Schedulability depends on correct proposal syntax, you should resolve any Syntax problems before addressing the Feasibility and Schedulability diagnostics.
This section lists the name and any other important information (coordinates, flux, and so on) for each target used in the visit.
This section lists the exposures in the visit, reflecting what was specified for each exposure in the proposal. It also indicates the allocation of exposures to orbits and whether any exposures have been lengthened or shortened by RPS2 in order to use orbits more efficiently.
To save space on the display, the target for each exposure is referred to only by its number in the target list. If you have more than one target in the target list for that visit, you should check to make sure you are observing the right target in each exposure.
This section is generated by the Feasibility subsystem. It is a graphical representation of the exposure section with (hopefully) helpful comments, meant to assist the observer in designing a visit so that it fits into the number of allocated orbits. There are exposure-level special requirements that allow you to specify which exposures can be lengthened or shortened and by how much. If you are iterating on how to best fill your orbits, you probably should turn off Schedulability to reduce processing time.
A key to the color and hatching scheme is available by clicking on the " HELP " vertical bar to the right of the section. Each orbit is represented by a 96-minute orbital timeline, and the major events of the orbit are noted separately (e.g., guide star acquisition, target acquisition, exposures, unused target visibility, and occultation). Note that each exposure is shown with all associated overhead included. The actual on-target exposure time is displayed in brackets next to the total time.
This section is generated by the Schedulability subsystem and has a graphical timeline of when the visit could be scheduled. All calculated constraints are displayed in separate bar graphs above the visit's scheduling timeline. These are physical constraints affecting target visibility (e.g., Sun, Moon) and absolute or relative constraints reflecting special requirements on timing and/or orientation.
All user-imposed constraints are plotted, but only those physical constraints which actually affect scheduling are plotted. For example, if the target is within 50 degrees of the Sun at some point during the year, the Sun constraint graph will appear and will have a dashed line during the time that the target is too close to the Sun for observation with HST. If the target is never within 50 degrees of the Sun, no Sun constraint graph will appear.
The resulting Total Scheduling Windows which are the intersection of the individual constraint plots, are plotted at the bottom. You can click on the name next to each constraint time line to see a report which contains all the schedulable date spans.
Hard copy versions of the Proposal Summary and all Visit Analysis reports can be created as PostScript files (extension .ps ) by clicking on " Write PS Files " at the top of the RPS2 User Interface window. If any of the reports contain diagnostics, a separate file, having the long explanation of each diagnostic, will be generated for each report. A file named help.ps is also generated; it contains all the help panels concatenated together. You can then print these files to a local PostScript printer.
Changes can be made to the proposal while still in RPS2 by clicking on " Edit " at the top of the window. If you have chosen the proposal editor (PED) to be your editor (see Changing the Default Editor), the proposal will be loaded into PED and initial syntax checking will be performed automatically. Otherwise the editor will be the one selected in your EDITOR environment variable (e.g., emacs). If your EDITOR environment variable has not been set, the internal RPS2 text editor will be used. When editing is complete, just save the file and you can reprocess the proposal. You need not quit the editor.
The following unix command will set the EDITOR environment variable on most unix systems:
If you would like to save a copy of the current version of a proposal before making changes, you can do this from the " Backup.. ." option available from the " File.. . " menu. When you click on " Backup... " you will be given a sub menu with the options: " Backup Current Version ," " Restore Backup Version , " and " Remove Backup. " All options prompt you for a name for your backup. This name can be any alphanumeric text string (including periods, dashes and underscores) but should not include characters that would be unacceptable in a file name (such as blanks or slashes).
The advantage of using this method for backing up your work, is that all the cached files and other output files that have been created so far are archived with the proposal. This will save processing time when you restore the backup. You also have all the cached files and output files in your current working directory so incremental changes will take less time.


Each proposal that you work on with RPS2 has a history file. This file is maintained across different RPS2 sessions and contains time and date stamps. To view the history file, select the " History... " option from the " File... " menu. The two choices are " View History " and " Add To History. " " View History " will bring up a screen with the most recent activity listed at the top. This screen can be left up if desired and will be updated as new steps are done. " Add To History " will allow you to add a line of free text to the history log file.
When RPS2 detects a system error, it displays a window to the screen. The text in the box should be self-explanatory. For example if you click on the " Submit " option, but have not first " Select "ed a proposal, you will get a small window which says "No Proposal Selected." Click on " Dismiss " at the bottom of the small window when you are finished reading the error message.
Less straightforward error conditions may yield system messages that are hard to understand. If you encounter an cryptic error message, contact your Program Coordinator; be sure to include the text of the error message in your message to the PC. This is easy to do since each session of RPS2 keeps a log of all system errors. The rps2-error file can be found in the directory RPS2 was started in, and can be copied directly into an e-mail message. Along with the error message, please include the version of the proposal that had the problem and the history of your session (this is stored in the file ####.log ).
Some large programs can take more than a half hour to process. This can be frustrating if you need to iterate many times to resolve problems. Here are some tips to make RPS2 run faster:
When you place the cursor on one of the buttons at the top of the RPS2 User Interface, a short description of that option appears just below in one-line message box.
The " Help " button on the User Interface will bring up a World Wide Web client (such as Netscape) and display the RPS2 Help Page. This page (see Getting Help) contains the RPS2 User's Manual, up-to-date advisories list of known RPS2 problems, links to other Phase II information and a list of Program Coordinators.
The default World Wide Web client which the RPS2 " Help " button invokes can be set by typing
at the Unix prompt before running RPS2. You may wish to add this to your shell setup file (for example in the C shell, place this command in your .cshrc file).
When you click on one of the Description Generator " Help " bars at the right margin of a section in a report, a description of that section will be displayed.
Command line users, as well as any user who prefers to view their output in PostScript form, can print out the file help.ps in order to have a hard copy of all the Description Generator section help panels.
Once you have written your Phase II proposal, processed it, examined the output products -- confirming that it is error-free and within its orbit allocation -- and are confident that the proposal will obtain the data you need, you can submit your proposal to STScI using the " Submit " button on the main RPS2 User Interface.
If you haven't done so already, " Select " the proposal file that you wish to submit and confirm that the proposal file ( <#>.prop ) uses your assigned proposal ID number.
The diagnostic files in the proposal directory from the most recent processing of the proposal will be checked before the proposal is actually submitted to STScI. If there are outstanding diagnostics, a red warning message will appear to remind you that there are still problems with the proposal. If there is a bug or limitation in RPS2 that makes it impossible for you to submit the proposal without errors, you must discuss this problem with your Program Coordinator before you submit the proposal . If the problem cannot be resolved, you can submit the proposal, but it will be flagged as having problems and your PC will tell you how to proceed.


The submission software returns an automatic electronic acknowledgment to you via e-mail that your proposal has been received. Both your Program Coordinator and your Contact Scientist will be notified of your submission, and you should receive a message from your PC regarding the acceptance of your proposal in a few days.
| Abstract and Table of Contents | Previous Section | Next Section |